INSTALASI WORDPRESS
DI UBUNTU SERVER 14.04
ASSALAMU’ALAIKUM WR.WB
Hayy... jumpa lagi nihhh
Oke kali ini saya akan membagikan artikel
tentang bagaimana cara menginstal wordpress menggunakan ubuntu server 14.04.
Wordpress adalah sebuah aplikasi sumber terbuka yang digunakan sebagai
mesin blog . WordPress dibangun dengan bahasa pemrograman PHP dan basis data (database) MySQL.
Pertama kita login, lalu masuk ke root (sudo
su)
Kemudian buat user baru
“adduser(spasi)nama_user”
Lalu untuk membuat link file , “ln –s
/home/wordpress/ /var/www/html/”
Untuk melihat user baru yang telah dibuat
tadi, gunakan perintah “ls /var/www/html”
Setelah itu kita buka filezilla (ftp client),
lalu masukan IP, username, dan password.kemudian pilih Quickconnect
upload file wordpress(milik client) yang
sudah di ekstrak. Cara mengupload nya sangat mudah , bisa dengan menyeret file
atau dengan Crtl+A kemudian seret filenya (drag and drop).
Tunggu sampai prosses upload selesai.
Pastikan tidak ada yang gagal.
Sekarang kita buka phpmyAdmin
“192.168.142.49/phpmyadmin” dan lakukan log in.
Buat database baru dengan nama "wordpress123" atau bisa menyesuaikan.
Jika kita sudah membuat database baru, Kemudian
buka browser, dan masukkan “192.168.142.49/wordpress/”
Lalu selanjutnya akan muncul tampilan
seperti ini. Piih Let’s Go
Selanjutnya akan muncul tampilan seperti dibawah ini, disini pada bagian database name isikan nama database yang telah dibuat tadi, lalu pada bagian username isikan root, dan password menyesuakan. pada bagian database host biarkan saja tetap localhost, dan pada table previx biarkan saja. kemudian submit.
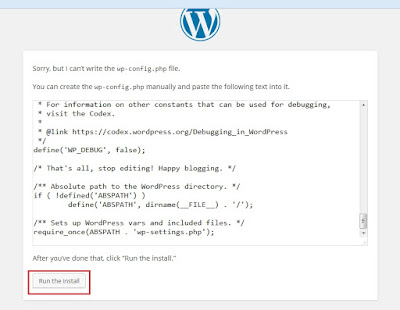
Kemudian akan muncul tampilan seperti ini.

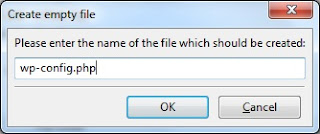
lalu Buat file baru di ftp server, caranya dengan klik kanan pada bagian ftp server, kemudian pilih "create new file" ,lalu beri nama “wp-config.php”
Kemudian jika sudah membuat file wp-config.php, sekarang isi file tersebut dengan cara klik kanan, lalu pilih "view/edit" dan isikan dengan ini (atau lebih mudahnya copy pasti pada bagian yang atas tadi)
<?php
/**
* The base configuration for WordPress
*
* The wp-config.php creation script uses this file during the
* installation. You don't have to use the web site, you can
* copy this file to "wp-config.php" and fill in the values.
*
* This file contains the following configurations:
*
* * MySQL settings
* * Secret keys
* * Database table prefix
* * ABSPATH
*
* @link https://codex.wordpress.org/Editing_wp-config.php
*
* @package WordPress
*/
// ** MySQL settings - You can get this info from your web host ** //
/** The name of the database for WordPress */
define('DB_NAME', 'wordpress123');
/** MySQL database username */
define('DB_USER', 'root');
/** MySQL database password */
define('DB_PASSWORD', 'via123');
/** MySQL hostname */
define('DB_HOST', 'localhost');
/** Database Charset to use in creating database tables. */
define('DB_CHARSET', 'utf8mb4');
/** The Database Collate type. Don't change this if in doubt. */
define('DB_COLLATE', '');
/**#@+
* Authentication Unique Keys and Salts.
*
* Change these to different unique phrases!
* You can generate these using the {@link https://api.wordpress.org/secret-key/1.1/salt/ WordPress.org secret-key service}
* You can change these at any point in time to invalidate all existing cookies. This will force all users to have to log in again.
*
* @since 2.6.0
*/
define('AUTH_KEY', '+iZu<+5M.q_x@JM#NWPKVY-l!oOphU$X{w{d0sM@!+/!6]#]%B(RQ=SQa=&0JI{Y');
define('SECURE_AUTH_KEY', '_!4jkU|g [S~:-p:4&!MdBrN2?I_o1)p jnG]jf,eei[HS1=TNsN$I,(|;rUh.<(');
define('LOGGED_IN_KEY', 'a&=wD83|pvLDJ_mSvIRD$wh)9|$wx5;UbN,.Xf`E>t=s33cq0e45-,g[T`#Xu`7G');
define('NONCE_KEY', 'srVxQ=[GtY%PmZ|CDd2S{`a0mN25xg>`&!B-]nOzMIsq3_*Qavn&>Kb?^1E8f+wA');
define('AUTH_SALT', '$;0&WZ9`9R#?Iu&.6r> 2D3,`Mz>;pPK2^R#+Fje`-ZK`>K(aJg%bV@$I(D`}/_s');
define('SECURE_AUTH_SALT', '3:N}=VC*cS`M>)8nN|z}YX|AM/ V@E&!f]K1HSQ .|kfN6dcOfli-H@ug.c@h#d@');
define('LOGGED_IN_SALT', '-,zQ6J5Hqr{*m+*5=XJgfT}t~r/NhwbBcF^][V%85Q`90d0qEWs, #g?%D}egrci');
define('NONCE_SALT', 'W9j|[Oo0+_l;FvouB<w.m1DuGg>}L<4sf-V+yU?&4/Zh=0o~IspY-1P8o9^,+#B~');
/**#@-*/
/**
* WordPress Database Table prefix.
*
* You can have multiple installations in one database if you give each
* a unique prefix. Only numbers, letters, and underscores please!
*/
$table_prefix = 'wp_';
/**
* For developers: WordPress debugging mode.
*
* Change this to true to enable the display of notices during development.
* It is strongly recommended that plugin and theme developers use WP_DEBUG
* in their development environments.
*
* For information on other constants that can be used for debugging,
* visit the Codex.
*
* @link https://codex.wordpress.org/Debugging_in_WordPress
*/
define('WP_DEBUG', false);
/* That's all, stop editing! Happy blogging. */
/** Absolute path to the WordPress directory. */
if ( !defined('ABSPATH') )
define('ABSPATH', dirname(__FILE__) . '/');
/** Sets up WordPress vars and included files. */
require_once(ABSPATH . 'wp-settings.php');
kemudian simpan (ctrl+s)./**
* The base configuration for WordPress
*
* The wp-config.php creation script uses this file during the
* installation. You don't have to use the web site, you can
* copy this file to "wp-config.php" and fill in the values.
*
* This file contains the following configurations:
*
* * MySQL settings
* * Secret keys
* * Database table prefix
* * ABSPATH
*
* @link https://codex.wordpress.org/Editing_wp-config.php
*
* @package WordPress
*/
// ** MySQL settings - You can get this info from your web host ** //
/** The name of the database for WordPress */
define('DB_NAME', 'wordpress123');
/** MySQL database username */
define('DB_USER', 'root');
/** MySQL database password */
define('DB_PASSWORD', 'via123');
/** MySQL hostname */
define('DB_HOST', 'localhost');
/** Database Charset to use in creating database tables. */
define('DB_CHARSET', 'utf8mb4');
/** The Database Collate type. Don't change this if in doubt. */
define('DB_COLLATE', '');
/**#@+
* Authentication Unique Keys and Salts.
*
* Change these to different unique phrases!
* You can generate these using the {@link https://api.wordpress.org/secret-key/1.1/salt/ WordPress.org secret-key service}
* You can change these at any point in time to invalidate all existing cookies. This will force all users to have to log in again.
*
* @since 2.6.0
*/
define('AUTH_KEY', '+iZu<+5M.q_x@JM#NWPKVY-l!oOphU$X{w{d0sM@!+/!6]#]%B(RQ=SQa=&0JI{Y');
define('SECURE_AUTH_KEY', '_!4jkU|g [S~:-p:4&!MdBrN2?I_o1)p jnG]jf,eei[HS1=TNsN$I,(|;rUh.<(');
define('LOGGED_IN_KEY', 'a&=wD83|pvLDJ_mSvIRD$wh)9|$wx5;UbN,.Xf`E>t=s33cq0e45-,g[T`#Xu`7G');
define('NONCE_KEY', 'srVxQ=[GtY%PmZ|CDd2S{`a0mN25xg>`&!B-]nOzMIsq3_*Qavn&>Kb?^1E8f+wA');
define('AUTH_SALT', '$;0&WZ9`9R#?Iu&.6r> 2D3,`Mz>;pPK2^R#+Fje`-ZK`>K(aJg%bV@$I(D`}/_s');
define('SECURE_AUTH_SALT', '3:N}=VC*cS`M>)8nN|z}YX|AM/ V@E&!f]K1HSQ .|kfN6dcOfli-H@ug.c@h#d@');
define('LOGGED_IN_SALT', '-,zQ6J5Hqr{*m+*5=XJgfT}t~r/NhwbBcF^][V%85Q`90d0qEWs, #g?%D}egrci');
define('NONCE_SALT', 'W9j|[Oo0+_l;FvouB<w.m1DuGg>}L<4sf-V+yU?&4/Zh=0o~IspY-1P8o9^,+#B~');
/**#@-*/
/**
* WordPress Database Table prefix.
*
* You can have multiple installations in one database if you give each
* a unique prefix. Only numbers, letters, and underscores please!
*/
$table_prefix = 'wp_';
/**
* For developers: WordPress debugging mode.
*
* Change this to true to enable the display of notices during development.
* It is strongly recommended that plugin and theme developers use WP_DEBUG
* in their development environments.
*
* For information on other constants that can be used for debugging,
* visit the Codex.
*
* @link https://codex.wordpress.org/Debugging_in_WordPress
*/
define('WP_DEBUG', false);
/* That's all, stop editing! Happy blogging. */
/** Absolute path to the WordPress directory. */
if ( !defined('ABSPATH') )
define('ABSPATH', dirname(__FILE__) . '/');
/** Sets up WordPress vars and included files. */
require_once(ABSPATH . 'wp-settings.php');
lalu akan ada peringatan seperti ini , centang terlebih dahulu kemudian pilih "yes"
Sekarang baru pilih "Run the Install"
Pada bagian ini site title isikan judul untuk
wordpress kita, disini saya menggunakan nama saya. Lalu pada bagian user name,
isikan nama yang udah diingat , karena username digunakan untuk log in. Lalu
masukkan password kemudian centang pada bagian confirm use weak a password dan
jangan lupa masukkan alamat email juga. (karena untuk log in bisa menggunakan email ataupun username). Jika sudah diisi sekarang pilih
InstallWordpress.
Jika
muncul tampilan seperti ini (succes) berarti wordpress berhasil diinstal, dan
kemudian pilih Log in.
Untuk
masuk ke wordpress masukkan username (bisa juga menggunakan email) dan password. Lalu Log in
Dan
inilah tampilah dari dashboard wordpress
Itulah tadi langkah-langkah menginstal
wordpress dengan meggunakan ubuntu server.
selamat mencoba, semoga berhasil.
WASSALAMU’ALIKUM WR.WB.


Tidak ada komentar:
Posting Komentar